Creating a shared web site library in Visual Studio
There are many ways to create and consume code libraries for use in multiple web site projects within Visual Studio. One of the most popular options is to create a class library project and link to it from multiple web site solutions. A similar alternative is to place the binary dll files that are created when compiling a class library project into the bin directory of each web site solution you want to use it in, and reference it directly. While both of these methods work well (the first generally being the most practical) there are a few things that they cannot easily accomplish.
Because of the way ASP.NET works, creating a code library that is easy to update and that can be used by multiple team members working on multiple distinct projects is challenging. You may want your code library to incorporate binary dll files from vendors or the open source community, web user controls (.ascx files), classes containing useful functions that are written in different languages, style sheets, web pages, images, etc.. The trick with ASP.NET is that often times certain types of files must go in specific places. For instance, dll files need to be placed in the bin directory, while your custom classes and server controls need to be placed in the App_Code directory. Web pages, web user controls, style sheets, and images can generally be placed in any directory.
svn:externals
The best solution that I have come up with this far is to use the “externals” function build into Subversion. To get up-to-speed on Subversion and the best way to use it from Visual Studio, read my previous posts here and here.
The Subversion externals property allows you to include a file or directory from one repository in another repository. For instance, Directory#1 in RepositoryA can be included in RepositoryB without RepositoryB actually containing or keeping track of Directory#1. This is done in such a way that the working copies of RepositoryB will contain Directory#1, but Subversion knows that Directory#1 is actually in RepositoryA instead of RepositoryB. This is all somewhat confusing when we are starting out, so lets walk through actually creating everything.
Creating the shared library
Since it we can’t really create web user controls in class library projects, the code library that we are going to share is actually going to be a web site project. That way we can include everything that gets used in web sites. Set up a web site with something like the following structure:

As you can see, the web site I’ve created doesn’t actually contain any web pages (.aspx files). I have only web user controls (.ascx files), dll files, and C# code files. I have items in folders in the App_Code folder, the Bin folder, and the root folder. I should note that this web site will not currently build – that is because Database.cs depends on the EntitySpaces libraries, which are not in the root of the Bin folder. We’ll get to the reason for this in a minute. The directories named “Shared” are the ones that are going to get copied into each web site that we want to use this library with, so place everything you want to use more than once in the appropriate “Shared” directory. You might want this solution and this solution only to contain unit tests (for instance) for the library, so you may want to place those outside of the “Shared” directories.
So now that the shared web site is set up, we need to get it into a Subversion repository. Follow the directions here, from my previous post. We need to get the project into a repository so that we can use the svn:externals function in the web sites we want to include these files in.
Using the shared library
Now that we have our web site library in a repository and ready to go, we’ll need another web site that we actually want to use the shared library in. If you’ve been following my posts, you probably know the drill by now. Create a new web site following these directions and put it in a repository.
To review, these are the steps we have done so far:
- Created a web site containing the files we want to go in our shared library (we’ll call it BShared)
- Placed BShared in a repository (it got its own repository)
- Created a web site that will use our shared web site (we’ll call it BTest)
- Placed BTest in a repository (it also got its own repository)
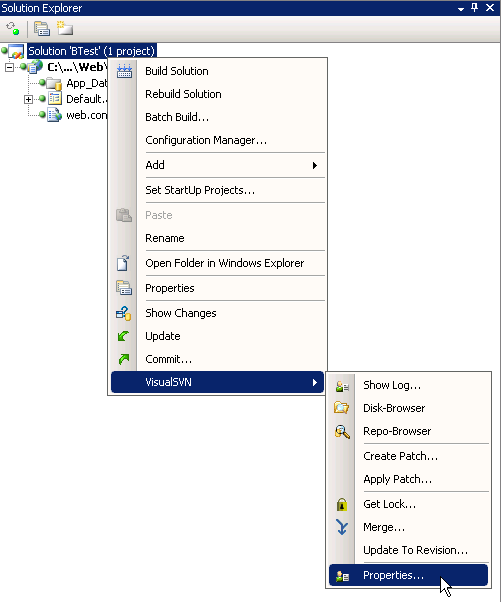
Next comes the easy part: linking the files from the BShared repository into the BTest repository. To do this, right click on “Solution ‘BTest’ (1 project)” in the Visual Studio Solution Explorer, and select “Properties…” from the VisualSVN menu.
From the Properties window that opens, click “Add…”. For the property name select “svn:externals”. In the “Property value:” section, enter something that looks like the following, matched to your repository:
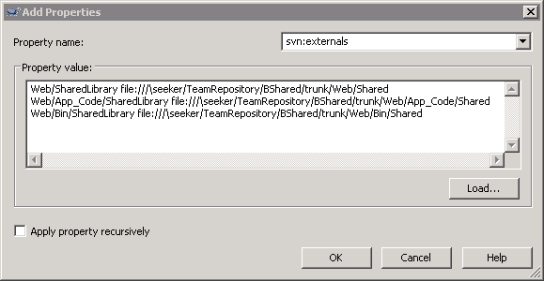
The settings above will place:
- BShared/Shared into BTest/SharedLibrary,
- BShared/App_Code/Shared into BTest/App_Code/SharedLibrary, and
- BShared/Bin/Shared into BTest/Bin/SharedLibrary.
Note that the list above is abbreviated – the full paths are actually used, just like in the screenshot. Save the properties, and then run an Update from the VisualSVN menu. You should notice that the “Shared” directories get checked out of the BShared repository and placed in the corresponding SharedLibrary folders. After all of these steps, the web site I’m working on looks like this:

There is one problem that still needs to be taken care of. You need to select all of the files in Bin/SharedLibrary, and copy them directly into Bin. This has to be done because class libraries cannot be in subdirectories of Bin – they have to be in the Bin root. Make sure you copy and past them to Bin instead of moving them! Moving them would remove them from your shared library project.
Summary
So that is all you really need to do to get a shared library up and running. You can do the above steps for multiple projects on multiple computers using the same shared library, but there are some important things you should consider. When you Commit your solution from the VisualSVN menu, the external files will not be committed (assuming they are in separate repositories, like the way I set them up). To commit the external files and therefor make changes to the shared library, you have to right click on the “SharedLibrary” folder you want to commit and from there use “Commit…”. You’ll have to do this for each SharedLibrary folder that has changes to commit.
In my opinion the ability to update the shared library from any project that is using it is one of the most useful features of setting up a shared library this way. We don’t have to open up a new project, write code, test it, copy it over, and then finally use it – instead we can simply act as if the library is actually a part of the project we are working on. For instance, if we were to add a web user control in SharedLibrary/BCMS/Controls and then commit SharedLibrary, the new web user control would be seen by all of the projects using this shared library when they run an update on the solution!
A few extra notes:
- Remember that when using this method any change to the shared web site project is seen by all of the projects using it. This means that a file getting deleted in one project gets deleted in all projects. A solution to this is to use revision numbers in your svn:externals value. Example:
Web/SharedLibrary -r5 file:///\seeker/TeamRepository/BShared/trunk/Web/Shared
Web/App_Code/SharedLibrary -r5 file:///\seeker/TeamRepository/BShared/trunk/Web/App_Code/Shared
Web/Bin/SharedLibrary -r5 file:///\seeker/TeamRepository/BShared/trunk/Web/Bin/Shared
- When initially developing code to incorporate into the library, I suggest you do it outside of the SharedLibrary folders. That way you don’t have to worry about buggy code breaking others web sites. When you have it working, copy it over into the appropriate SharedLibrary folder and run a Commit on it. An alternative is to simply not run a Commit until you are sure the code is good.
- For more information about svn:externals go here.
- This method will work perfectly in a team environment. The svn:externals property only needs to be set up once. After it is set up and the solution is committed once, other team members who check out the solution or update their working copies will automatically get the externals.
